Wednesday, December 29, 2010

Baked Pecan French Toast

Today I am going to share with you a wonderful recipe I tried from another blog.

This isn't just any other blog though....

It's my friend Kara's blog. 

She has a lot of fun recipes over there

And every once in a while, I steal borrow one to share on my blog

2 weeks ago she posted this and I knew I had to try it.

I mean, I LOVE french toast... and it was easy.

No brainer right?

I figured this would be the perfect Christmas morning breakfast because basically all I had to do is put it in the oven in the morning (and turn the oven on).

I was right!

It was AH-MAZING! 

My parents were here to try it as well and all 9 of us LOVED it!

Thanks Kara!

Here's the recipe:
Ingredients:
4 large eggs
1 cup milk
1/4 cup sugar
1/8 tsp. ground cinnamon
1/8 tsp. ground nutmeg
1/2 tsp. vanilla extract
8 ounce loaf French bread, cut into 12 one inch thick slices
1/2 cup chopped pecans
2 tbsp. melted butter

Directions:
The night before
Lightly coat the bottom of a 12x8 inch glass baking dish with cooking spray.
Whisk together eggs, milk, sugar, cinnamon, nutmeg and vanilla in medium bowl.
Place bread slices in a single layer in the bottom of the prepared dish.
Pour the egg mixture over the bread and turn to coat.
Cover and refrigerate overnight. (very important to refrigerate overnight)

The morning ofPreheat oven to 425 degrees.
Sprinkle bread slices with pecans and drizzle melted butter over.
Bake about 20 to 25 minutes until bread slices are puffed and pecans are deep brown.
Serve immediately.

Serves 4 to 6.
Just out of the oven


***Review:
We all LOVED it!  It wasn't soggy (which is what my mom feared) it was perfect.  and let me tell you...it was waaaay easier than frying up french toast at the stove (for 9 people).... not to mention a little healthier.
 My oldest son and I made it up around midnight on the 24th... it was very fast and easy to make.  We made two batches and it was the perfect amount!    All 5 kids ate it all up!  They want it again soon!  I do too! :)

**Tips:
I will agree with Kara that the nuts tend to burn if you cook them the whole time, I will recommend that you add the nuts the last 10 or 15 minutes and that should help.  I bought 2 loaves of italian bread at the store and sliced them probably finger width thick... I was afraid if you sliced it too thick it would be soggy in the middle.  They came out perfect.  Also, do not forget to spray the pan....they will stick and it will ruin breakfast.  We served this with some turkey bacon and syrup.... mmmmm!

Friday, December 24, 2010

Garlic Shrimp Pasta


This is a recipe I modified from one my Aunt makes.

She was born and raised on an island in Italy and is a wonderful cook.

I grew up watching her cook and bake .... and I loved it!

One day she came to my dad's house with some linguini.... went to his garden and cut up some fresh tomatoes... added some diced garlic, fresh basil leaves, olive oil and a little salt... and there was her dish to pass.

It was awesome!! 

It was room temperature and a quick easy pasta "salad" and sooo fresh tasting.

I was thinking while I was eating it that some shrimp scampi would be great over top of this... then I thought maybe some spinach... and boom... a new recipe was born.

She laughs when I tell her I came up with this from her simple pasta salad.

Anyway, I love this dish. 

I don't make it very often because shrimp can be expensive and also, it's a little time consuming to make.

But I knew it was definitely a recipe I had to share on my blog

So when shrimp went on sale... I was all over it.

I hope you enjoy it as much as the rest of us!

Ingredients:
6 C Fresh spinach, cut up
1 Bag shrimp, raw
10+ Cloves of garlic, diced
8 Roma tomatoes, diced (= to about 4 cups diced)  *Or you can use petite diced tomatoes  maybe 2-3 cans
1/2 C Olive oil
1 Tbs butter
1 tsp garlic salt... or more to taste
1 Box linguini
*1/4 C Fresh Parmesan cheese (optional topping)

Directions:
Cut up spinach, tomatoes and garlic first (set aside)

Shell and de-vein shrimp (set aside)
In large pot, bring water to boil for Linguini
Boil noodles until done (aprox 8-10 minutes)
While noodles are boiling:
Add about 2 Tbs olive oil to a large fry pan
Add about half the garlic and sautee lightly

Add the spinach until it gets soft and wilty

Add the diced tomatoes and cook until warm

Set the cooked veggies aside
In another fry pan, (on Med/high heat) add 2 more Tbs of olive oil and  1/4 of the garlic you have left
Add 1 Tbs butter and shrimp

cook just until pink

Sprinkle with garlic salt to taste
As soon as shrimp is done, add in veggie mix and cook about 2 minutes until heated through

When pasta is done, drain & rinse
Place pasta back in pan and add remaining olive oil and garlic to it (you can salt it also)
Serve by adding pasta to individual bowls and topping with shrimp mixture.


***Review:
We all love this dish. Because of a shellfish allergy, we don't allow the little kids to eat shrimp yet, but the two older ones loooooove this dish!  Of course the 8 yr old picks out the spinach & tomato, but that's to be expected.  This is a family favorite for sure.  The little kids are happy to eat garlic noodles with parmesan on top! 


**Tips:
Definitely make sure you have your shrimp,veggies, and pasta water prepped before you start.  It makes it a lot easier.  I didn't boil the pasta 1st this time and I was all off.  The shrimp was done way before the pasta...

lots of multitasking going on here
 and FYI... if you let shrimp keep cooking after they're done, they will get dry and rubbery.  So you want to stop cooking them right after they turn pink. I just took them off the heat until the pasta was done and re heated them quickly right before we ate.  It was a pain though.
Seeding roma tomatoes is ideal. It makes them less watery... which is what you want.  Here is a photo of how it looks.  Just slice in half from the top down and scoop out the seeds.  It's pretty easy.

Tomato on the left is seeded, tomato on the right is not
Also, I hope the recipe makes sense.  I've never written it down before now, so I kind of wrote it as I went.  Please feel free to ask if you have any questions or if I wasn't clear on something!
I hope you love it just as much as we do!


For printable directions see below:

Ingredients:
6 C Fresh spinach, cut up
1 Bag shrimp, raw
10+ Cloves of garlic, diced
8 Roma tomatoes, diced (= to about 4 cups diced)  *Or you can use petite diced tomatoes  maybe 2-3 cans
1/2 C Olive oil
1 Tbs butter
1 tsp garlic salt... or more to taste
1 Box linguini
*1/4 C Fresh Parmesan cheese (optional topping)

Directions:
Cut up spinach, tomatoes and garlic first (set aside)
Shell and de-vein shrimp (set aside)
In large pot, bring water to boil for Linguini
Boil noodles until done (aprox 8-10 minutes)
While noodles are boiling:
Add about 2 Tbs olive oil to a large fry pan
Add about half the garlic and sautee lightly
Add the spinach until it gets soft and wilty
Add the diced tomatoes and cook until warm
Set the cooked veggies aside
In another fry pan, (on Med/high heat) add 2 more Tbs of olive oil and  1/4 of the garlic you have left
Add 1 Tbs butter and shrimp and cook until pink
Sprinkle with garlic salt to taste
As soon as shrimp is done, add in veggie mix and cook about 2 minutes until heated through
When pasta is done, drain & rinse
Place pasta back in pan and add remaining olive oil and garlic to it (you can salt it also)
Serve by adding pasta to individual bowls and topping with shrimp mixture.

Wednesday, December 22, 2010

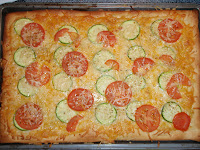
White Garden Pizza

So I'm still in this sort of blah phase.

I'm slowly coming out of it.... I must be getting used to the perpetual darkness of the sky.

I think I'm getting back into the cooking spirit (I hope)

Tomorrow I will be making an awesome Shrimp/Pasta dish.... so be sure to check back!

Yesterday I forgot to put something in the crockpot before I went to the dentist and ran errands

So I ended up making this yummy pizza because it's both easy and awesome! 

Also, I told the kids they could have whatever they wanted for dinner and they chose pizza.

This isn't exactly what they had in mind... but they liked it (thankfully)

I first tried this at a pampered chef party. 

It was so fun to make and even more fun to eat. 

I've made it a few times since then and always wonder why I don't make it more often

I've brought it to parties for an appetizer and it's always a hit!

I'm sure you will agree.  (unless you don't like garlic or veggies... then you might not)  :)

FYI:  It's called "White" pizza because it doesn't have the red sauce that most pizza has.

 Ingredients:

1 pkg refrigerated Pizza crust
1 Small onion, sliced into thin rings
1 Medium Zucchini,sliced
1-2 Roma tomatoes, sliced
1 C. Mushrooms, sliced
2-4 Garlic cloves, crushed
1 C Shredded Mozerella cheese
1 C Shredded Cheddar cheese
1/4 C Shredded Parmesan Cheese
1 tsp Italian seasoning
3 Tbs Olive oil

Tools:
Cookie sheet (greased)
Garlic press
Basting/pastry brush (click the link to see what the heck a pastry brush is)
Sharp knife
Cutting board
Small bowl

Directions:
Preheat oven to 400°F.
Roll pizza crust onto a greased cookie sheet and press it to the edges


Poke the crust a few times with a fork to make small holes
Bake crust 7 minutes.
Remove from oven

Slice veggies and set aside


In a small bowl, add Olive oil and pressed garlic, stir

Using basting brush, brush oil-garlic mix onto the crust

Sprinkle mozzarella and cheddar cheeses evenly over crust
Top with onion, zucchini, mushrooms and tomatoes.

Sprinkle Parmesan cheese over vegetables

 Sprinkle with Italian seasoning

 Bake 12-15 minutes or until crust is golden brown
Remove from oven and cut into wedges using a Pizza Cutter.


***Reviews:
Well, as I was making this, the kids were saying.."Maaaa---ahm"  I don't LIKE tomatoes... I don't LIKE zucchini"  And I told them they could just pick it off.  Well, they did pick it off... but otherwise they loved the pizza.  They asked for seconds.  I knew going in that they wouldn't eat the toppings.  (well the baby did... but he still likes veggies)  I LOVED it.. as always and hubs loved it as well.  There were no leftovers! This pizza has a very fresh taste to it... reminds me of summer.  I am a big fan of roasted veggies and this pizza has just the right mix.  The garlic definitely makes the veggies pop.   I would recommend adding the onions and mushrooms too... they make it even better.  But I knew my kiddos would not try it with either of those on there so none for us tonight.  Next time!

**Tips:
You can use your own crust for this if you want... I sometimes make my own.  But I find that store bought is easier in a pinch... and it tastes great. When rolling the crust out onto the cookie sheet, you can use a rolling pin.  Mine was too big and didn't fit, so I just started in the middle and pushed the dough outward (with my fingers) evenly until it reached the edges of the pan.
If you don't have a garlic press you can just dice it as finely as you can... that will work.
As for veggies, you can really use any kind you want... but I really enjoy this mix.  I would recommend that you use roma tomatoes (the oval shaped ones) because they are less watery than regular tomatoes... but if you don't have them, don't worry... just place your sliced tomatoes on a paper towel to absorb some of the excess liquid and then put them on your pizza.  also, don't even think about using that powdered parmesan cheese (the kind you put on your spaghetti) on this.... anytime I say use parmesan.. it will ALWAYS be grated fresh.. .not powdered.  Yuk!


Here is a printable photo free version of the recipe:
Tools:
Cookie sheet (greased)
Garlic press
Basting/pastry brush (click the link to see what the heck a pastry brush is)
Sharp knife
Cutting board
Small bowl


Ingredients:
1 pkg refrigerated Pizza crust (10 oz pkg)
1 Small onion, sliced into thin rings
1 Medium Zucchini,sliced
1-2 Roma tomatoes, sliced
1 C. Mushrooms, sliced
2-4 Garlic cloves, crushed
1 C Shredded Mozerella cheese
1 C Shredded Cheddar cheese
1/4 C Shredded Parmesan Cheese
1 tsp Italian seasoning
3 Tbs Olive oil


Directions:
Preheat oven to 400°F.
Roll pizza crust onto a greased cookie sheet and press it to the edges
Poke the crust a few times with a fork to make small holes
Bake crust 7 minutes.
Remove from oven

Slice veggies and set aside

In a small bowl, add Olive oil and pressed garlic, stir
Using basting brush, brush oil-garlic mix onto the crust
Sprinkle mozzarella and cheddar cheeses evenly over crust
Top with onion, zucchini, mushrooms and tomatoes.
Sprinkle Parmesan cheese over vegetables
 Sprinkle with Italian seasoning
 Bake 12-15 minutes or until crust is golden brown
Remove from oven and cut into wedges using a Pizza Cutter.


Sunday, December 19, 2010

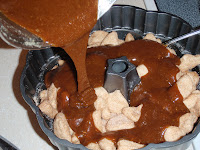
Monkey Bread

This recipe is by far one of my favorites.

Not only does it taste awesome, but it's super easy.

The kids love to help me make it

They also love to eat it.

We can make a whole pan of this disappear in one sitting... sadly. ;)

This is a great thing to bring to holiday parties or just to have at home.

It's a great thing to have with a big breakfast as well

Until a few years ago I never knew this existed.

I saw Paula Deen on a cooking show for kids and she made this with them...

I quickly got the recipe and made it with  my kids and have been making it ever since.

Maybe you have already heard of this and have made it before,

But if not.... you definitely have to try it. 

Monkey Bread

Ingredients:

4 cans refrigerator biscuits (about 40)
1 1/2 tablespoons cinnamon
1 cup white sugar
1/2 cup butter (1 stick)
1 cup brown sugar, packed
*1/2 cup pecans, raisins and/or coconut, if desired

Directions:

Preheat oven to 350 degrees
Cut each biscuit into 4 pieces.


Pour sugar and cinnamon into a plastic bag (or bowl) and mix.
Add biscuit pieces, several at a time; shake to coat well.

Place pieces in a buttered Bundt pan until all are used.

*Sprinkle layers with nuts, raisings or coconut if desired
Bring brown sugar and butter to a boil in saucepan.

Cool 10 minutes, then pour over top of biscuits.


Bake at 350F for 45 minutes.

Allow to cool 15 minutes before removing from pan. (or you'll burn yourself...lol)
Put a plate over the top and then turn upside down on the plate to serve.
Lift pan gently up and ........
you have yummy warm monkey bread to eat!
***Review:
This is LOVED by the whole famliy.  We haven't met one person yet that doesn't like it.

**Tips:
The kids love to help.  The best way is to give them each some scissors and let them cut or if they're too little for scissors, they can mix them in the bag or put them in the pan... depending on how many helpers you have.
I don't always measure the sugar/cinnamon mix. I just kind of do it to taste. When I have leftover sugar, I just throw it in a ziplock bag for next time (next time is never far away). Make sure to take out any bits of dough that might have stayed in though.  Also, make sure you butter or spray your pan, you want the bread to just "fall" out when you tip it over. 
If you don't happen to have a bundt pan, you can make this in a loaf pan or even an angel food cake pan.  I have done both.  If you use an angel food cake pan, make sure to put a cookie sheet or foil under it because it will leak a little of the "syrup" out of the bottom because of the way it's designed. 


If you want to print just the recipe without all the photos see below:

Monkey Bread
Ingredients:
4 cans refrigerator biscuits (about 40)
1 1/2 tablespoons cinnamon
1 cup white sugar
1/2 cup butter (1 stick)
1 cup brown sugar, packed
*1/2 cup pecans, raisins and/or coconut, if desired


Directions:
Preheat oven to 350 degrees
Cut each biscuit into 4 pieces.
Pour sugar and cinnamon into a plastic bag (or bowl) and mix.
Add biscuit pieces, several at a time; shake to coat well.
Place pieces in a buttered Bundt pan until all are used.
*Sprinkle layers with nuts, raisings or coconut if desired
Bring brown sugar and butter to a boil in saucepan.
Cool 10 minutes, then pour over top of biscuits.

Bake at 350F for 45 minutes.
Allow to cool 15 minutes before removing from pan.
Turn upside down on plate to serve

Saturday, December 18, 2010

Asian beef in the crockpot


Ok, so I have been slacking this week. 

I just realized that I haven't posted since Monday and today is Saturday.

Have no fear though.... I will have my 3 posts in by Sunday.

This week has been especially busy for us.

We had 2 school delays and one snow day. (not normal for this time of year) 

These kinds of things totally threw me off.

Not to mention, I spent most of my free time finishing up Christmas shopping

And then hubs car broke down.... and we had a piano recital... you get the picture. 

There was some grilled cheese,pizza & take out nights this week.

I am embarassed to mention how many.

I did, however, get lots of stuff at the grocery store to make some yummy dishes. 

I am hoping to cook a lot next week and have all that to share with you soon.
 

I have been in the mood for Asian food lately  (ahem, mostly take out)

So I have been searching for something I can make at home.

I actually made this Asian Beef recipe last night, in hopes of blogging about it then.

I made the mistake of getting it into the crockpot too late.

I figured I would just put it on high and it might be done by dinner.

Nope!

One thing I already know is that you can't rush a roast.

So when it wasn't done at 6pm, I threw some penne pasta on and heated up some sauce & veggies

Viola! Instant dinner.

I let the roast keep cooking for another 2 hours and it was done.

So, it's dinner tonight.


Ingredients:
4 pounds boneless beef or pork roast ( I used deer)
1/2 C  soy sauce
1/2 C hoisin sauce
4 Tbs ketchup
6 Tbs honey
2 tsps Chinese 5-spice powder*
 2 tsp garlic powder (or 6 cloves, minced) ( I used fresh garlic)
1/2 C Ty ling Sesame sauce( I added that later because I thought it needed it)
*(If you don't have the 5 spice powder you can try 1 1/2 tsp sesame oil, 3/4 tsp ginger, 1/2 tsp garlic salt)

The Directions:
Place the roast in a  5 quart crockpot. You can use fresh or frozen meat
Sprinkle the dry spices directly onto the meat, and top with the ketchup and honey.
Pour in the soy and hoisin sauces.
Cover and cook on low for 8-9 hours, or until meat shreds easily with a fork.
(definitely give it the whole 8 hours.... this is not a quick cooking recipe)
When it's tender/done shred up and put back in juices to serve

***Review:
The first taste went to my 8yr old whose eyes got huge and this thumb went up immediately!  After chewing he yelled out "Awesome".  This is a good sign.  I however, didn't love it.  I think that the hosin sauce just isn't my thing.  It's a little more spicy/bbq flavored and I like my asian food sweet/salty.  But, a few of the boys liked it.  A few didn't. Hubs is not home for dinner tonight, but I think he will probably like it.


**Tips:
As stated above, definitely let this thing cook for 8 hours on low.  It takes a long time for roast to be so tender that it shreds. 
Also, I would recommend serving this with rice.  I didn't have any so I used angel hair pasta... not the best idea.. but it works.  I have also seen that you can serve it over shredded cabbage, which I think would be good.  I actually have some, but it's for another recipe this week. 
also, if you do use noodles, you could add a little sesame oil to them to give it a little asian flavor.

Monday, December 13, 2010

Chicken Divan in the Crockpot

 
So I am running out of crockpot recipes.
 
I am going to have to scour the internet and cookbooks to get some more good ones.
 
I am sure if you're like me, you started off with a handful of tired and true recipes and ventured no further.
 
Because of this blog... I need to venture..... and venture some more.
 
This has led me to only one dinner drama disaster... so I can't complain.
 
Tonight  was not one of them thankfully.
 
I went Christmas shopping and wasn't home to try this one.
 
I left the photo taking and the serving to the hubs.
 
He did a great job on the serving
 
You'll have to forgive the photos....lol 
 
He is sweet enough to do it for me though... so I appreciate that.
 
Now, I'm not sure if you remember, but the hubs is NO chef.
 
So I figured this was a no brainer.
 
Take it out and serve.
 
Well, he surprised me tonight and doctored this dish up slightly for the kids.
 
and not in a bad way.
 
I believe he actually made this recipe better.
 
He fried up some ham and crumbled it and put it on top.
 
But... before you think he's had some kind of cooking epiffany
 
You must know....
 
He adds ham, honey & hot sauce to pretty much everything.
 
Regardless, adding the ham was a bonus on this occasion.
 
 
Ingredients
20 ounces frozen broccoli spears
6 chicken breasts
21 1/2 ounces cream of chicken soup, canned
2 cups mayonnaise
2 teaspoons lemon juice
3-4 slices of ham
 
Directions:
 
Place broccoli in slow cooker.
Place chicken on top of the broccoli.
Mix together the soup, mayonnaise and lemon juice.
Pour over the chicken.
Cover; cook on Low for 8 hours or high for 4
Cook ham in pan and crumble and put over top
or add ham slices to crockpot for last 30 minutes

***Review:
Well, I didn't eat it until later... but I still thought it was good.  Hubs said it was a little tangy... but that was the miracle whip speaking.  Otherwise, he liked it.  Kids ate it once hubs doctored it up.  It had broccoli IN it... so the fact that they ate it says something....lol  Love, love, love the ham on top!

**Tips:
Well, as stated above, Hubs added some fried ham to the original recipe and that made it great.  I did use
 1 C of miracle whip in place of 1 C of mayo... which I wouldn't necessarily recommend, but it wasn't awful.  I can see now how it altered the taste... which I knew was going to happen.  I thought I had more mayo ... but I only had one cup.  It was all in the crockpot... what's a girl to do?  ;) 
Also, since it comes with the veggie in place, hubs served this with a side of tomato parmesan Pasta Roni .  I don't make everything homemade you know!

Wednesday, December 8, 2010

Chili


It's cold!

Reeeeeally cold! 

Time to break out the "winter food" recipes

I love chili!

It's so warm and comforting to eat.

I'm only "allowed" to make it in the winter though.

Hubs has issues with me making soup or chili when it's warm out.

I find that slightly wierd...

So sometimes, I sneak in soup.

I'm a rebel....lol

But, now that it's chili season I thought I'd share my favorite chili recipe with you!


Ingredients:
1 (29oz) can of tomato sauce
1 (28oz) can of whole tomatoes
2 (28oz) cans of crushed tomatoes
1 large Onion (or 2 small ones), diced
1 (1.25oz) pkt of chili seasoning
10 cloves of garlic, diced
2 lbs of ground beef/turkey (cooked)
2 cans kidney beans, undrained
**shredded cheese (optional toppings)
**sour cream (optional toppings)
**crackers (optional toppings)

Dont have packaged chili seasoning?
Make your own-
Ingredients for homemade chili seasoning:
2 tablespoons chili powder
1 tablespoon seasoned salt
2 teaspoons cumin
1 teaspoon oregano
1 teaspoon salt
1 teaspoon onion powder
1/2 teaspoon garlic powder

Directions:
Brown the ground beef and drain grease
Add all ingredients (except toppings) into a large pot
Cook 3-4 hours on low/med (or longer) with lid off
Stir occasionally
**Serve with toppings above or anything else that sounds good :)

FYI: This is a 5 qt pot and it's pretty full. It definitely makes a lot of chili!

***Reviews:
I really like this chili.  The hubs would prefer if it was much much more spicy, but he likes it otherwise.He just adds his cholula hot sauce to his own bowl.  The kids will not eat it.... and I don't expect them to.  But it's a pretty good recipe I think.  I really love all the garlic in it! It's pretty chunky too... not a "soupy" kind of chili.

**Tips:
Chili is a pretty basic dish.  You can add almost anything you like.  That's the great part about it.  You can add steak chunks, jalapenos, hot sauce, green pepper.  Or you can take out the garlic or onion .... it's flexible. Add more beans or take them out entirely. If you want it more soupy, you can replace the whole tomatoes for tomato sauce or even (blah) tomato juice (my mom does this). She also adds little noodles so it's more like goulash.  I have even seen people add cocoa powder.
Also, I had a friend that used this basic recipe and added a can of hormel chili as well. I thought that was pretty good too.  What I love about chili is that no two chili's are alike.... so get creative and make it your own.
Cooking it as long as you can is best... but  make sure it's on low because you do not want to burn the bottom... yuk!  It's almost always better the next day too.  
Another bonus?  You can put it all in the crockpot and cook it all day.  How cool is that!
You can easily freeze any leftovers too! 
Gotta love chili!

*Serving it:
I cannot eat chili without sour cream and cheese in it... seriously! 
It's awesome with crackers too.
One of the best add ins?  French fries!  Serious... try it somtime.
You can also just eat it plain OR with a little Italian bread.
Anything is better with Italian bread!

Tuesday, December 7, 2010

Meatball Sub Casserole

Well, I don't know about you but this winter weather is getting to me already.

I miss the sunshine.

I miss the warm air.

I miss my motivation!

For some reason, I have not felt like cooking at all this past week

I mean, I'm even too lazy to put something in the crockpot

Yeah... it's that bad.

My kids need clean socks

Hubs needs clean work clothes

And here I am.... sitting in my heated blanket.

Blah! 

I just don't feel like doing anything.

I think I have that seasonal affective disorder

Or I'm just lazy...lol 

Luckily, I have a stockpile of things in the freezer

And my father in law made dinner for me one night.

He's a great cook, by the way! Mmmm!

Last night I got a little motivation and made a recipe I haven't made in years

My friend Laura made it for me when I had a baby and I had to have the recipe.

It's great!

I've been wanting to share it with you, but didn't have all the ingredients in the house at one time

Until recently.

See, I have these rules....

Like, grocery rules.

There are certain things I WILL NOT buy unless they are a certain price.

My friends are laughing right now because they know this and make fun of me for it

For example I will not buy grapes unless they are under a dollar per pound!  No exceptions.

Yes, really.

It can't be helped..... I have standards....lol

One of the other things I won't buy is pre made meatballs.

They are expensive...

So I wait until they go on sale BOGO and then I buy a few bags and keep them in the freezer.

Last week they went on sale....

So now I can share my recipe with you!

And in case you're wondering, yes, I do have my own meatball recipe. 

But remember above how I said I was being lazy?  Yeah.

I'll share that recipe with you another time.

Ingredients:
1 loaf Italian bread
8 oz. Cream cheese
1/2 C Mayo
1 tsp Italian seasoning
1/4 tsp Pepper
2 C Shredded Mozzarella
1 lb.  Frozen meatballs (thawed)
28 oz. Jar pasta sauce or make your own with my homemade sauce recipe
1 C Water

Directions:
Pre-heat oven to 350 degrees
Slice bread into 1 inch slices

Arrange slices in an ungreased 9x13 baking dish

In a bowl, combine cream cheese, mayo & spices
Spread them onto bread in dish

Sprinkle bread with 1/2 C shredded cheese

In another bowl, mix meatballs, sauce & water and stir
Pour meatball mixture over bread in baking dish

Sprinkle with remaining cheese

Bake uncovered for 30 minutes or until thoroughly heated

Mmmmmmmmmmmmmmmmm!!! 


***Review:
I got an all thumbs up for this!  ALL of them!  Can you believe it?  It's a Christmas miracle!
This is a great comfort food on a cold night! I love it!  Now that I have lots of meatballs, I can make it more often ;)

**Tips:
You may want to use more than 1 lb of meatballs.  There just wasnt enough in this dish... although I didn't measure them, I think next time I will just make sure the whole top of the dish is covered in meatballs. 
As for the Moz. cheese, I think I might add more of that too.  I actually added a little fresh Parmesan to the top of mine as well to give it a little more flavor (aprox. 1/4 C)
Also, I forgot to defrost the meatballs before I added them to the sauce so they went in mostly frozen.  It seemed to work out fine.  I just left it in the oven a few minutes longer....making sure to keep and eye on it so the cheese didn't burn.  No one likes burnt cheese. 
The only complaint I got from this dish is that it was "too cheesy" meaning the cream cheese part.  I didn't add the whole bowl of mixture to the bread slices.  I just basically "buttered" each slice with the mayo/cream cheese mix and had a lot left over. Next time I might just cut that part of the recipe in half and see if that is better.  I still liked it this way, but I think a little less cream cheese would be good.
Oh and last but not least, this took about 45 minutes from fridge to table.  Not too shabby!

Saturday, December 4, 2010

Grandma's Biscotti "S" Cookies

My taste tester/neighbor invited me to a Christmas cookie exchange.

I have never been to one before.

The idea of baking 7 dozen cookies kind of freaked me out.

I really wanted to do it though, so I started looking for recipes that were easy to bake a zillion of, but still yummy.

I am limited on time and can't stay in baking all day long... ya know?

My mom suggested I make my grandma's "S" cookies.

These are a staple food in our family.

Whenever my grandma is around, there are these cookies.

I have been eating them my whole life and I love them

My husband is totally addicted.

Whenever my parents visit us, my grandma sends bags of the cookies with them

I have never made them alone before... she always does it.

I have had the recipe for years, but never needed to use it.

So, with a phone call in to Grandma for a little support (she's in AZ for the winter), I decided to try them.

To my surprise,they came out perfect.

My dad happened to be visiting when I was baking so he and the hubs got to judge the goodness of my cookies.... compared to grandmas.

They were a hit!

Phew!


Ingredients:

6 eggs (room temperature)
2 C Sugar
1 C Oil
2 tsp Baking powder
8 C flour (plus more to flour your kneading surface)
2 tsp Anise oil

Directions:

Beat together eggs, oil & sugar
Add vanilla, baking powder & anise oil
Hand mix in 7 cups of  flour gradually

until you get a thick bread dough consistency.. you do not want it sticky

Flour your countertop and place dough on counter

Knead the rest of the flour into the dough until you get the consistency you need.  You many need more or less flour.
Once dough is ready, shape it into a loaf and let sit for 20 minutes

When dough is ready, slice strips off dough and roll into long "snakes" (like playdough)


Cut into 5 inch sections and make into "S" shape.

Grease a cookie sheet and place cookies on sheet.

Preheat your oven to 350 degrees and bake for 20 minutes or until slightly golden on top

Makes 95 cookies

***Review:
Everyone loves these cookies.  I don't think I've ever met anyone who doesn't.  Kids, adults... everyone!  Even if you don't like black licorice... which most people don't, you will still like them.   You can't even taste it at all.  I love that, given the amount of flour you use, there isn't too much sugar.  The cookies end up not too sweet.... which I love.  Just a little hint.  Try them for yourself...see if you disagree!

**Tips:
Make sure you do not over cook these or they will be very dry and hard (though my mom actually likes them that way)
Also, you can frost these if you want but most people like them plain.
If you want to make frosting, my grandma always uses a few Tbs milk mixed with some powdered sugar to get a thick consistency, frosts them with that and then adds christmas sprinkles to the top.
You could even dip the tips into chocolate, if you like that. 
These are great in coffee or tea.  Really, it's just biscotti shaped into a cookie.
If you don't know what Anise oil is, it's a black licorice flavoring that can be found near the vanilla in the grocery store

**In case you want to print the directions in an easy to read, picture free way, here they are:

Directions:
 Beat together eggs, oil & sugar
Add vanilla, baking powder & anise oil
Hand mix in 7 cups of  flour gradually until you get a thick bread dough consistency
You do not want it sticky
Flour your countertop and place dough on counter
Knead the rest of the flour into the dough until you get the consistency you need.  You many need more or less flour.
Once dough is ready, shape it into a loaf and let sit for 20 minutes
When dough is ready, slice strips off dough and roll into long "snakes" (like playdough)
Cut into 5 inch sections and make into "S" shape.
Grease a cookie sheet and place cookies on sheet.
Preheat your oven to 350 degrees and bake for 20 minutes or until slightly golden on top