Showing posts with label baking. Show all posts

Saturday, October 29, 2011

Old Fashioned Apple Crisp


  • Well.... here I am with a recipe.  

  • All of my excuses as to where I've been will be on the next post (since I actually wrote that one first)... so you will have to tune in again in a few days if you care to know.. or if you really like Garlic Grilled Salmon. :)
Well... it's fall and that means baking in my house.  Apple pies abound when the Courtland apples are ripe.  

I went to the orchard the other day and bought a peck of Courtlands.  

Problem?  well, I couldn't find the time to actually DO anything with them and I was afraid they were going to go bad.  

I know I've mentioned that I am cheap... so spending $10 on apples and not using them is nearing illegal for me.... ha!

So I peeled them and chopped them and then I made one large pie with a store bought crust (shhh).  

It actually was really yummy!

But I still had a HUGE amount of apples and nothing to do with them.
  •   
  • I didn't feel like making or buying  pie crust... so my friend Kristi suggested apple crisp.  

  • I said no, that I don't really like apple crisp, but thanks for the suggestion.   

  • Well the next morning all these chopped apples were staring at me from the bowl and I didn't want them to go bad.  

  • So, I googled "apple recipes"
After going through what felt like a million, I finally found Food network's Old Fashioned Apple Crisp recipe

It was simple and didn't call for a ton of ingredients or time.... so I made it.

I didn't have high expectations... but I don't like to waste food.

Well... you'll have to read to the review part to see what we thought!

Old Fashioned Apple Crisp
  • Ingredients
  • 5 pounds McIntosh or Macoun apples  ( I used Courtland apples)
  • Grated zest of 1 orange    
  • Grated zest of 1 lemon   ( I didn't use any zest... because I didn't have any)
  • 2 tablespoons freshly squeezed orange juice   ( I used store bought orange and lemon juice)
  • 2 tablespoons freshly squeezed lemon juice
  • 1/2 cup granulated sugar
  • 2 teaspoons ground cinnamon
  • 1 teaspoon ground nutmeg

For the topping:

  • 1 1/2 cups flour
  • 3/4 cup granulated sugar
  • 3/4 cup light brown sugar, packed
  • 1/2 teaspoon kosher salt  (* I used regular salt)
  • 1 cup oatmeal
  • 1/2 pound cold unsalted butter, diced  (* I used salted butter... because that's what I had on hand)

Directions

Preheat the oven to 350 degrees F. Butter a 9 by 14 oval baking dish.( I used a 9x13 rectangle pan)
Peel, core, and cut the apples into large wedges or chunks. Combine the apples with the zests, juices, sugar, and spices. Pour into the dish.

To make the topping, combine the flour, sugars, salt, oatmeal, and cold cubed butter in the bowl of an electric mixer fitted with the paddle attachment. 

Mix on low speed until the mixture is crumbly and the butter is the size of peas. 

Scatter evenly over the apples.


Place the crisp on a sheet pan and bake for 1 hour* (mine only took 45 minutes) or until the top is brown and the apples are bubbly. Serve warm.


I didn't get a pic of it on the plate (sorry).  We had company for dinner so I totally forgot to take a picture once we were eating!  
***Reviews:
This was a HUGE hit with everyone!!!    I will be making this often because it tastes amazing and was so easy.  We had company the night we served it and everyone had 2 servings (with the kids begging for even more).  It was even good re heated!  Not soggy at all!

**Tips:
You can read above all the places I changed things.  I didn't add the zest and I think it tasted perfect.  I also didn't measure the apples, but I think there was about 8 to 10 cups of them.  I just filled the dish! 
 Also, I happen to have a kitchen aid mixer with a paddle attachment (thanks hubs), but if you don't you can use a regular hand mixer.  Basically, the butter needs to blend into the flower/oats and get all crumbly.  Note: the butter HAS to be cold... if it isn't, it won't form the little crumbles that you need for the top! 
As for mixing,you could even do it by hand if you had to... I mean, there weren't Kitchen Aid's when apple crisp was invented right?  
Also, in case you don't have time to bake this right at the same time you're making dinner... you can make it ahead of time.  I made mine in the afternoon and it was lukewarm by dinner and tasted great. It doesn't have to be piping hot.   
Oh... one more thing, my friend Kristi says this is awesome served with Vanilla Bean ice cream.  We didn't have any.... but I bet it's amazing!  Try it!


Printer Friendly Recipe


Old Fashioned Apple Crisp

  • Ingredients
  • 5 pounds McIntosh or Macoun apples
  • Grated zest of 1 orange
  • Grated zest of 1 lemon
  • 2 tablespoons freshly squeezed orange juice
  • 2 tablespoons freshly squeezed lemon juice
  • 1/2 cup granulated sugar
  • 2 teaspoons ground cinnamon
  • 1 teaspoon ground nutmeg

For the topping:

  • 1 1/2 cups flour
  • 3/4 cup granulated sugar
  • 3/4 cup light brown sugar, packed
  • 1/2 teaspoon kosher salt
  • 1 cup oatmeal
  • 1/2 pound cold unsalted butter, diced

Directions

Preheat the oven to 350 degrees F. Butter a 9 by 14 by 2-inch ovalbaking dish.
Peel, core, and cut the apples into large wedges. Combine the apples with the zests, juices, sugar, and spices. Pour into the dish.
To make the topping, combine the flour, sugars, salt, oatmeal, and cold butter in the bowl of an electric mixer fitted with the paddle attachment. Mix on low speed until the mixture is crumbly and the butter is the size of peas. Scatter evenly over the apples.
Place the crisp on a sheet pan and bake for 1 hour until the top is brown and the apples are bubbly. Serve warm.

Tuesday, March 1, 2011

Coffee Toffee Brownies

Doesn't that title just make your mouth water?  Mmmmmm!

I think I might be back from my bloggy break.

I'm not sure though.

I will admit that it's been nice to not have to worry about blogging!

Is that bad?

My mouth is feeling much better these days

In case you were wondering.

And... I started cooking yesterday, so I suppose I should share....

I made a basic lasagna for dinner using my homemade pasta sauce I had in the freezer.

And of course, I had to make some dessert to go with it.

I have had this brownie recipe sitting in my inbox since October. 

Every time I buy the heath bars, they get eaten before I can bake. 

This time, I hid them when I got home from the store.... HA!  

Here is the recipe:


Coffee Toffee Brownies:

1 box brownie mix*
3/4 C toffee pieces, for the batter (broken up)  
2 to 3 Tbs instant espresso powder or instant coffee crystals
3/4 C  vanilla frosting  
1 Tbs Irish cream liqueur or coffee liqueur
1/4 C toffee pieces, for the topping (broken up)
*(Don't forget ingredients the box mix calls for ie: eggs, oil & water)


Preheat oven to 350 degrees F.
Grease a 9 inch square baking pan ( I used 8x11)
Break up toffee pieces

Prepare brownie mix according to package directions, except stir the 3/4 cup toffee pieces and the espresso powder/instant coffee into batter.
Spread batter into prepared pan.

Bake in preheated oven for 35 minutes.

If not using frosting, add toffee pieces while brownies are still hot.

Let brownies cool. 
Frosting:
 In a small bowl, combine vanilla frosting and liqueur.
Spread frosting mixture onto cooled brownies.
Sprinkle with the 1/4 cup toffee pieces.
TO STORE: Place bars in a single layer in an airtight container; cover. Store in the refrigerator for up to 3
days.

***Review:These were a definite hit in our house.  I had no doubt that they would be.  Coffee flavored anything is good! Toffee anything is good... mix the two and you have a highly dangerous dessert!  Meaning, I just may eat the whole pan all by myself....lol   I may or may not have eaten these for breakfast AND lunch today!  They are the perfect chewy, crunchy, sweet, salty mix!  I am in love!!!!
Everyone else loved these too.  Although, we didn't use the frosting.... they were still amazing!  

**Tips:
As I said in the review, I did not use the frosting.  I have no doubt that it would add even more yumminess to these brownies... but, I am not a frosting person.  I like my brownies naked.  What I did was just top the brownies with 1/4 C of the broken toffee pieces as soon as it came out of the oven so it would kind of melt into the top. MMMMMMMMMMMM!
But if YOU try the frosting, please comment below and let me know how they were that way!
To break up the toffee bars into small pieces, I put them into a ziplock bag (squeezing out all the air) and used a meat tenderizer to "hammer" them into small pieces.(see photo above)  This way the pieces can be as large or as small as you want. You could also use any blunt object to smash them in the bag... or roll with a rolling pin.  You could get pretty creative :)
Also, as I said, I didnt use the 9 inch square pan.  I had an 8.5 x11 inch pan and that worked fine.  You could probably use and 8 x 8 as well.  
One last thing.... if you plan on feeding these things to children and/or eating them at night, I might suggest buying *Decaf* coffee crystals instead of the regular kind (that I bought).  Hindsight!!!


Printable Recipe:

Coffee Toffee Brownies

1 box brownie mix*
3/4 C toffee pieces, for the batter (broken up)  
2 to 3 Tbs instant espresso powder or instant coffee crystals
3/4 C  vanilla frosting  
1 Tbs Irish cream liqueur or coffee liqueur
1/4 C toffee pieces, for the topping (broken up)
*(Don't forget ingredients the box mix calls for ie: eggs, oil & water)


Preheat oven to 350 degrees F.
Grease a 9 inch square baking pan ( I used 8x11)
Break up toffee pieces
Prepare brownie mix according to package directions, except stir the 3/4 cup toffee pieces and the espresso powder/instant coffee into batter.
Spread batter into prepared pan.
Bake in preheated oven for 35 minutes.
Let brownies cool. 
Frosting:
 In a small bowl, combine vanilla frosting and liqueur.
Spread frosting mixture onto cooled brownies.
Sprinkle with the 1/4 cup toffee pieces.
TO STORE: Place bars in a single layer in an airtight container; cover. Store in the refrigerator for up to 3 days.

Wednesday, December 29, 2010

Baked Pecan French Toast

Today I am going to share with you a wonderful recipe I tried from another blog.

This isn't just any other blog though....

It's my friend Kara's blog. 

She has a lot of fun recipes over there

And every once in a while, I steal borrow one to share on my blog

2 weeks ago she posted this and I knew I had to try it.

I mean, I LOVE french toast... and it was easy.

No brainer right?

I figured this would be the perfect Christmas morning breakfast because basically all I had to do is put it in the oven in the morning (and turn the oven on).

I was right!

It was AH-MAZING! 

My parents were here to try it as well and all 9 of us LOVED it!

Thanks Kara!

Here's the recipe:
Ingredients:
4 large eggs
1 cup milk
1/4 cup sugar
1/8 tsp. ground cinnamon
1/8 tsp. ground nutmeg
1/2 tsp. vanilla extract
8 ounce loaf French bread, cut into 12 one inch thick slices
1/2 cup chopped pecans
2 tbsp. melted butter

Directions:
The night before
Lightly coat the bottom of a 12x8 inch glass baking dish with cooking spray.
Whisk together eggs, milk, sugar, cinnamon, nutmeg and vanilla in medium bowl.
Place bread slices in a single layer in the bottom of the prepared dish.
Pour the egg mixture over the bread and turn to coat.
Cover and refrigerate overnight. (very important to refrigerate overnight)

The morning ofPreheat oven to 425 degrees.
Sprinkle bread slices with pecans and drizzle melted butter over.
Bake about 20 to 25 minutes until bread slices are puffed and pecans are deep brown.
Serve immediately.

Serves 4 to 6.
Just out of the oven


***Review:
We all LOVED it!  It wasn't soggy (which is what my mom feared) it was perfect.  and let me tell you...it was waaaay easier than frying up french toast at the stove (for 9 people).... not to mention a little healthier.
 My oldest son and I made it up around midnight on the 24th... it was very fast and easy to make.  We made two batches and it was the perfect amount!    All 5 kids ate it all up!  They want it again soon!  I do too! :)

**Tips:
I will agree with Kara that the nuts tend to burn if you cook them the whole time, I will recommend that you add the nuts the last 10 or 15 minutes and that should help.  I bought 2 loaves of italian bread at the store and sliced them probably finger width thick... I was afraid if you sliced it too thick it would be soggy in the middle.  They came out perfect.  Also, do not forget to spray the pan....they will stick and it will ruin breakfast.  We served this with some turkey bacon and syrup.... mmmmm!

Sunday, December 19, 2010

Monkey Bread

This recipe is by far one of my favorites.

Not only does it taste awesome, but it's super easy.

The kids love to help me make it

They also love to eat it.

We can make a whole pan of this disappear in one sitting... sadly. ;)

This is a great thing to bring to holiday parties or just to have at home.

It's a great thing to have with a big breakfast as well

Until a few years ago I never knew this existed.

I saw Paula Deen on a cooking show for kids and she made this with them...

I quickly got the recipe and made it with  my kids and have been making it ever since.

Maybe you have already heard of this and have made it before,

But if not.... you definitely have to try it. 

Monkey Bread

Ingredients:

4 cans refrigerator biscuits (about 40)
1 1/2 tablespoons cinnamon
1 cup white sugar
1/2 cup butter (1 stick)
1 cup brown sugar, packed
*1/2 cup pecans, raisins and/or coconut, if desired

Directions:

Preheat oven to 350 degrees
Cut each biscuit into 4 pieces.


Pour sugar and cinnamon into a plastic bag (or bowl) and mix.
Add biscuit pieces, several at a time; shake to coat well.

Place pieces in a buttered Bundt pan until all are used.

*Sprinkle layers with nuts, raisings or coconut if desired
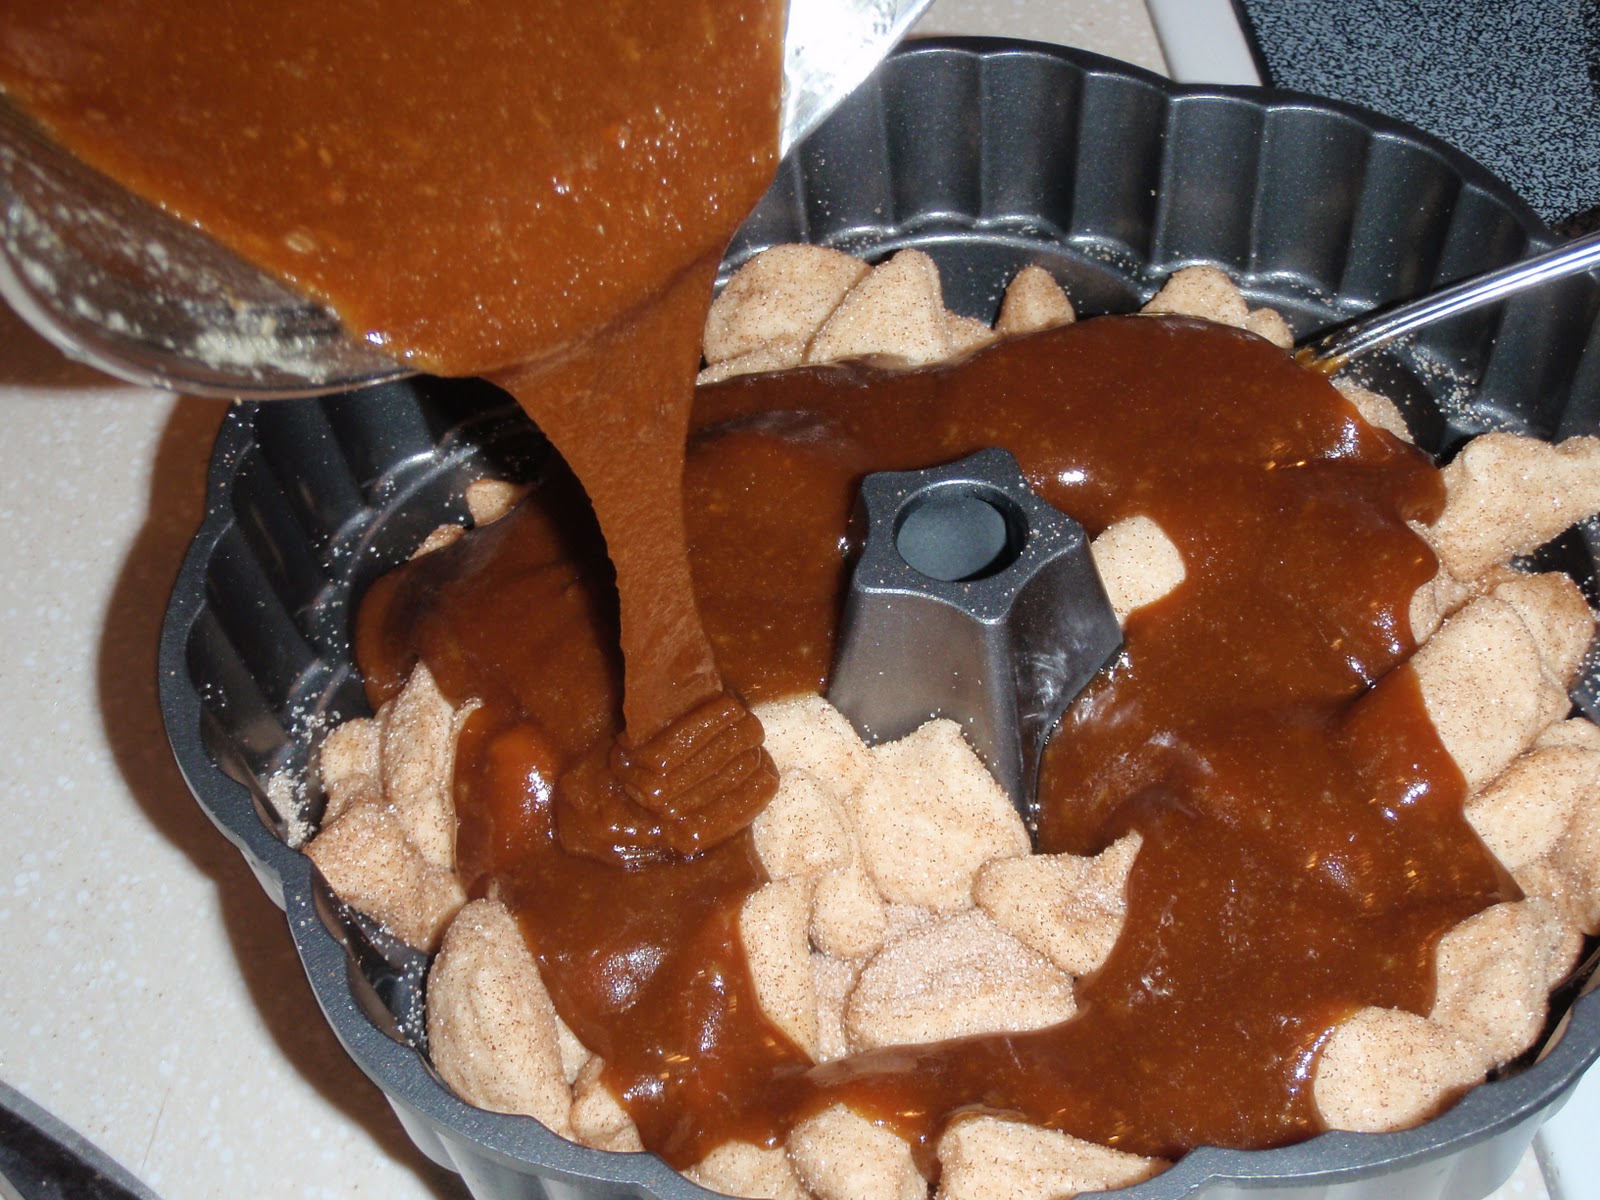
Bring brown sugar and butter to a boil in saucepan.

Cool 10 minutes, then pour over top of biscuits.


Bake at 350F for 45 minutes.

Allow to cool 15 minutes before removing from pan. (or you'll burn yourself...lol)
Put a plate over the top and then turn upside down on the plate to serve.
Lift pan gently up and ........
you have yummy warm monkey bread to eat!
***Review:
This is LOVED by the whole famliy.  We haven't met one person yet that doesn't like it.

**Tips:
The kids love to help.  The best way is to give them each some scissors and let them cut or if they're too little for scissors, they can mix them in the bag or put them in the pan... depending on how many helpers you have.
I don't always measure the sugar/cinnamon mix. I just kind of do it to taste. When I have leftover sugar, I just throw it in a ziplock bag for next time (next time is never far away). Make sure to take out any bits of dough that might have stayed in though.  Also, make sure you butter or spray your pan, you want the bread to just "fall" out when you tip it over. 
If you don't happen to have a bundt pan, you can make this in a loaf pan or even an angel food cake pan.  I have done both.  If you use an angel food cake pan, make sure to put a cookie sheet or foil under it because it will leak a little of the "syrup" out of the bottom because of the way it's designed. 


If you want to print just the recipe without all the photos see below:

Monkey Bread
Ingredients:
4 cans refrigerator biscuits (about 40)
1 1/2 tablespoons cinnamon
1 cup white sugar
1/2 cup butter (1 stick)
1 cup brown sugar, packed
*1/2 cup pecans, raisins and/or coconut, if desired


Directions:
Preheat oven to 350 degrees
Cut each biscuit into 4 pieces.
Pour sugar and cinnamon into a plastic bag (or bowl) and mix.
Add biscuit pieces, several at a time; shake to coat well.
Place pieces in a buttered Bundt pan until all are used.
*Sprinkle layers with nuts, raisings or coconut if desired
Bring brown sugar and butter to a boil in saucepan.
Cool 10 minutes, then pour over top of biscuits.

Bake at 350F for 45 minutes.
Allow to cool 15 minutes before removing from pan.
Turn upside down on plate to serve

Saturday, December 4, 2010

Grandma's Biscotti "S" Cookies

My taste tester/neighbor invited me to a Christmas cookie exchange.

I have never been to one before.

The idea of baking 7 dozen cookies kind of freaked me out.

I really wanted to do it though, so I started looking for recipes that were easy to bake a zillion of, but still yummy.

I am limited on time and can't stay in baking all day long... ya know?

My mom suggested I make my grandma's "S" cookies.

These are a staple food in our family.

Whenever my grandma is around, there are these cookies.

I have been eating them my whole life and I love them

My husband is totally addicted.

Whenever my parents visit us, my grandma sends bags of the cookies with them

I have never made them alone before... she always does it.

I have had the recipe for years, but never needed to use it.

So, with a phone call in to Grandma for a little support (she's in AZ for the winter), I decided to try them.

To my surprise,they came out perfect.

My dad happened to be visiting when I was baking so he and the hubs got to judge the goodness of my cookies.... compared to grandmas.

They were a hit!

Phew!


Ingredients:

6 eggs (room temperature)
2 C Sugar
1 C Oil
2 tsp Baking powder
8 C flour (plus more to flour your kneading surface)
2 tsp Anise oil

Directions:

Beat together eggs, oil & sugar
Add vanilla, baking powder & anise oil
Hand mix in 7 cups of  flour gradually

until you get a thick bread dough consistency.. you do not want it sticky

Flour your countertop and place dough on counter

Knead the rest of the flour into the dough until you get the consistency you need.  You many need more or less flour.
Once dough is ready, shape it into a loaf and let sit for 20 minutes

When dough is ready, slice strips off dough and roll into long "snakes" (like playdough)


Cut into 5 inch sections and make into "S" shape.

Grease a cookie sheet and place cookies on sheet.

Preheat your oven to 350 degrees and bake for 20 minutes or until slightly golden on top

Makes 95 cookies

***Review:
Everyone loves these cookies.  I don't think I've ever met anyone who doesn't.  Kids, adults... everyone!  Even if you don't like black licorice... which most people don't, you will still like them.   You can't even taste it at all.  I love that, given the amount of flour you use, there isn't too much sugar.  The cookies end up not too sweet.... which I love.  Just a little hint.  Try them for yourself...see if you disagree!

**Tips:
Make sure you do not over cook these or they will be very dry and hard (though my mom actually likes them that way)
Also, you can frost these if you want but most people like them plain.
If you want to make frosting, my grandma always uses a few Tbs milk mixed with some powdered sugar to get a thick consistency, frosts them with that and then adds christmas sprinkles to the top.
You could even dip the tips into chocolate, if you like that. 
These are great in coffee or tea.  Really, it's just biscotti shaped into a cookie.
If you don't know what Anise oil is, it's a black licorice flavoring that can be found near the vanilla in the grocery store

**In case you want to print the directions in an easy to read, picture free way, here they are:

Directions:
 Beat together eggs, oil & sugar
Add vanilla, baking powder & anise oil
Hand mix in 7 cups of  flour gradually until you get a thick bread dough consistency
You do not want it sticky
Flour your countertop and place dough on counter
Knead the rest of the flour into the dough until you get the consistency you need.  You many need more or less flour.
Once dough is ready, shape it into a loaf and let sit for 20 minutes
When dough is ready, slice strips off dough and roll into long "snakes" (like playdough)
Cut into 5 inch sections and make into "S" shape.
Grease a cookie sheet and place cookies on sheet.
Preheat your oven to 350 degrees and bake for 20 minutes or until slightly golden on top